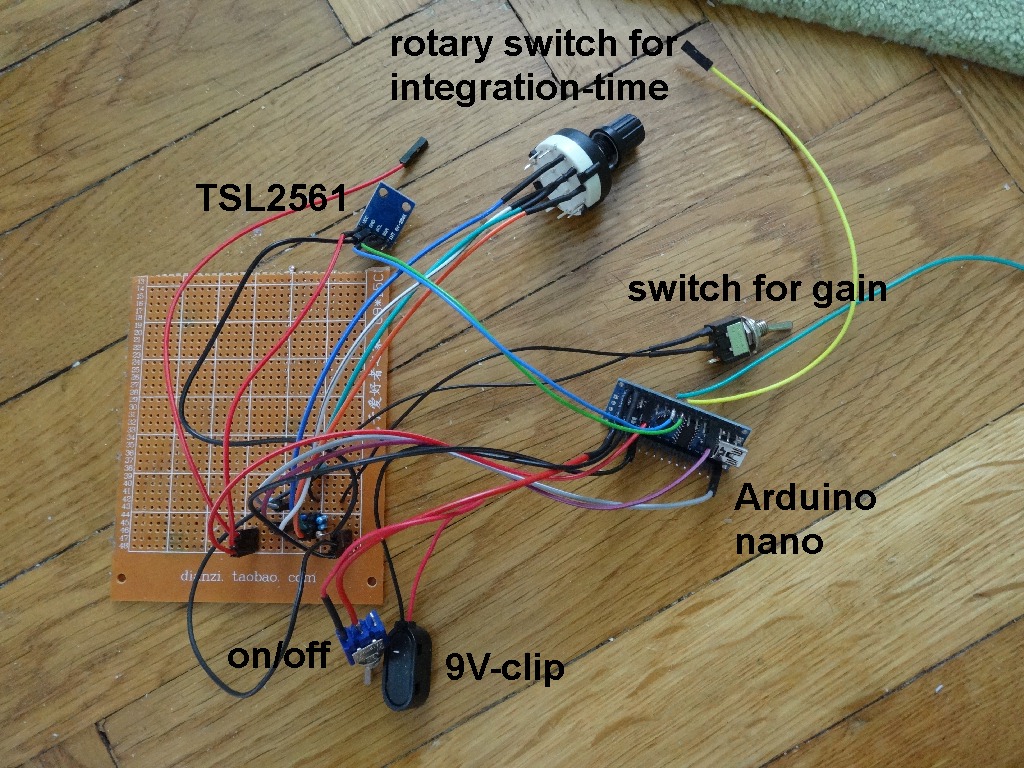
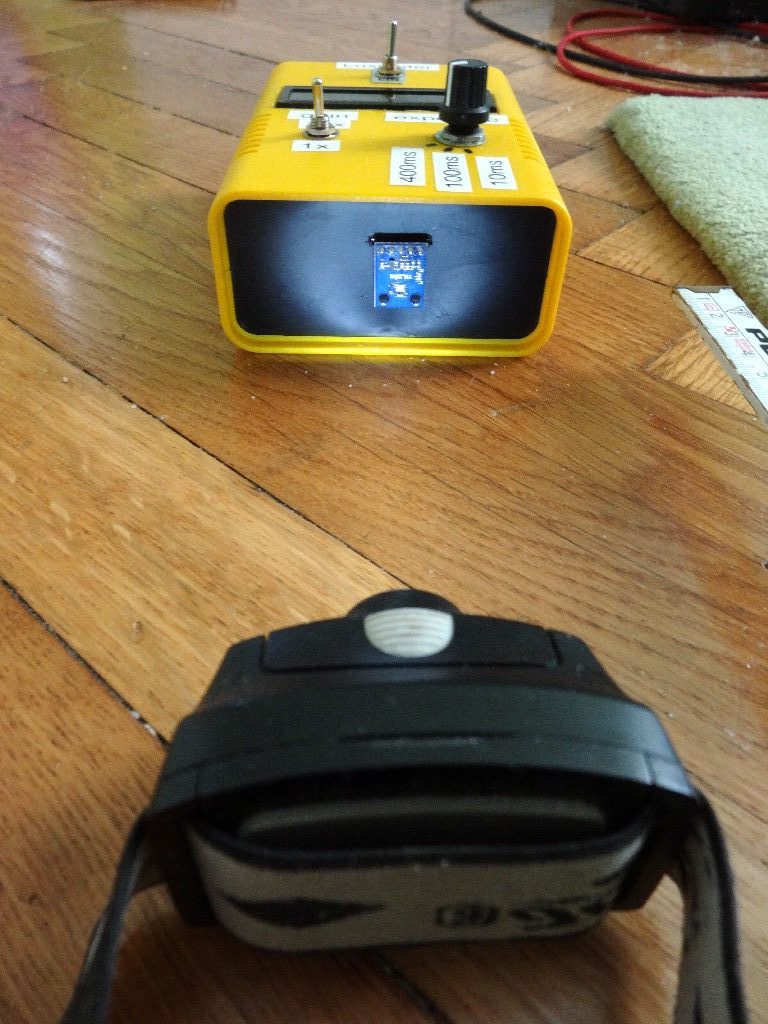
Mit dem Sensor TSL2561 lässt sich sehr einfach ein Lichtstärkenmessgerät/Helligkeitsmessgerät/Luxmeter umsetzen. Benötigt wird nur der Sensor selbst, ein Arduino, ein I2C 16×2 display, einen gewöhnlichen Ein/Aus-Schalter, einen 4×3 Drehschalter und 5 Widerstände.
Mit dem Ein/Aus-Schalter wählt man die interne Verstärkung des Signals (1x/16x) aus, mit dem 4×3 Drehschalter die Integrationszeit/Messzeit des Sensors (10ms/100ms/400ms). Damit lassen sich sowohl sehr schwache, als auch starke Lichtquellen (z.B. die Sonne) untersuchen.
Am Display ausgegeben werden
- reine Helligkeitswerte (ohne physikalische Einheit) und zwar einerseits basierend auf dem gesamten Spektralbereich (sichtbar + IR) und andererseits basierend nur auf dem Infrarot-Bereich
- die Beleuchtungsstärke (in Lux)
Während die reinen Helligkeitswerte bei gleicher Umgebung je nach Einstellung (gain, Messdauer) variieren, müsste die Beleuchtungsstärke (in Lux) bei gleichbleibenden Bedingungen natürlich unabhängig von den Einstellungen sein.




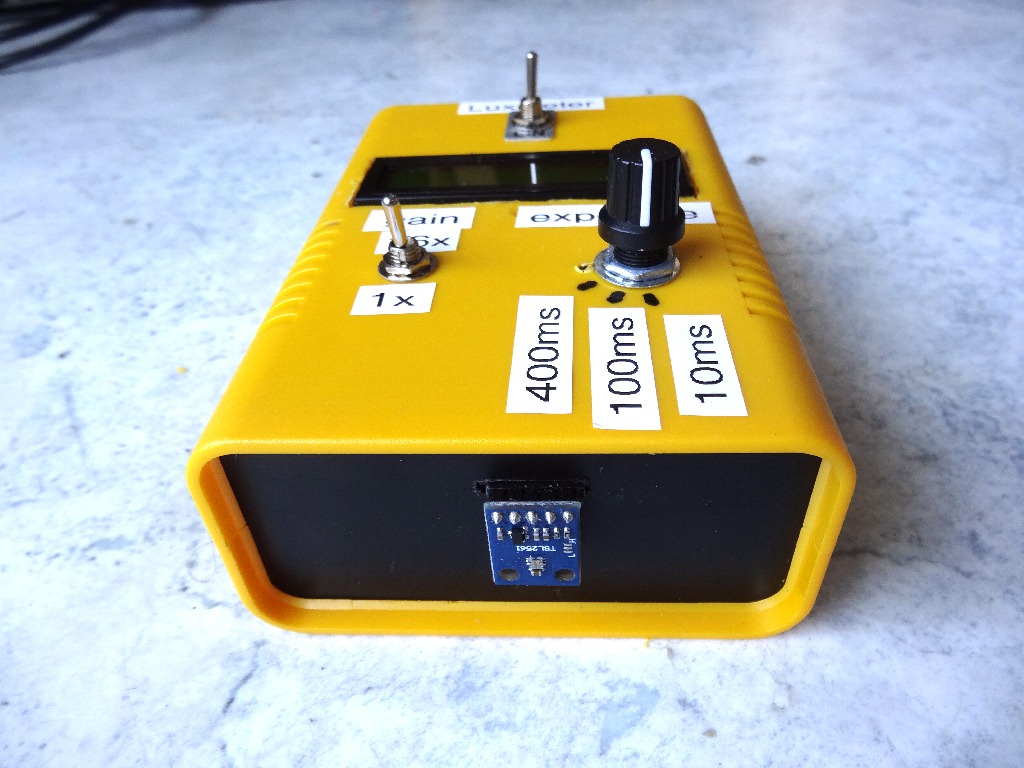
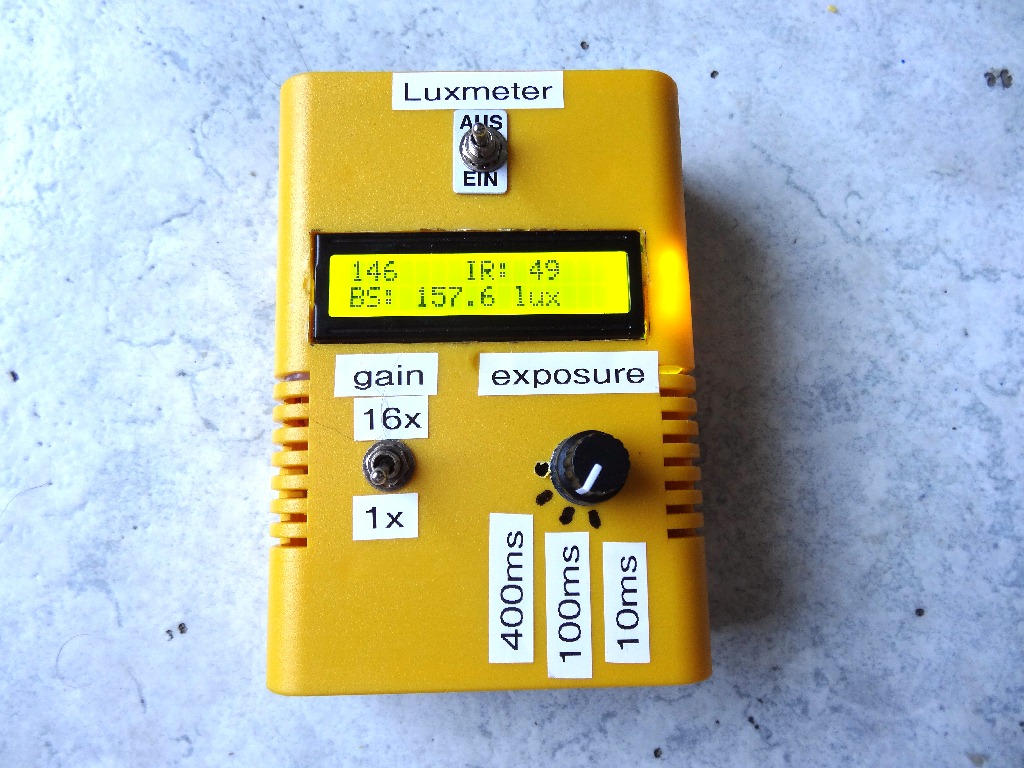
Experimente mit dem Lichtsensor:
Man kann zum Beispiel die Helligkeit/Beleuchtungsstärke einer Lichtquelle in Abhängigkeit vom Abstand d ermitteln und daraus dann eine Abstandsformel mit der Proportionalität 1/d^n herleiten. In meinem Fall erhalte ich (eigenartigerweise) eine 1/d^1.66 Abhängigkeit.
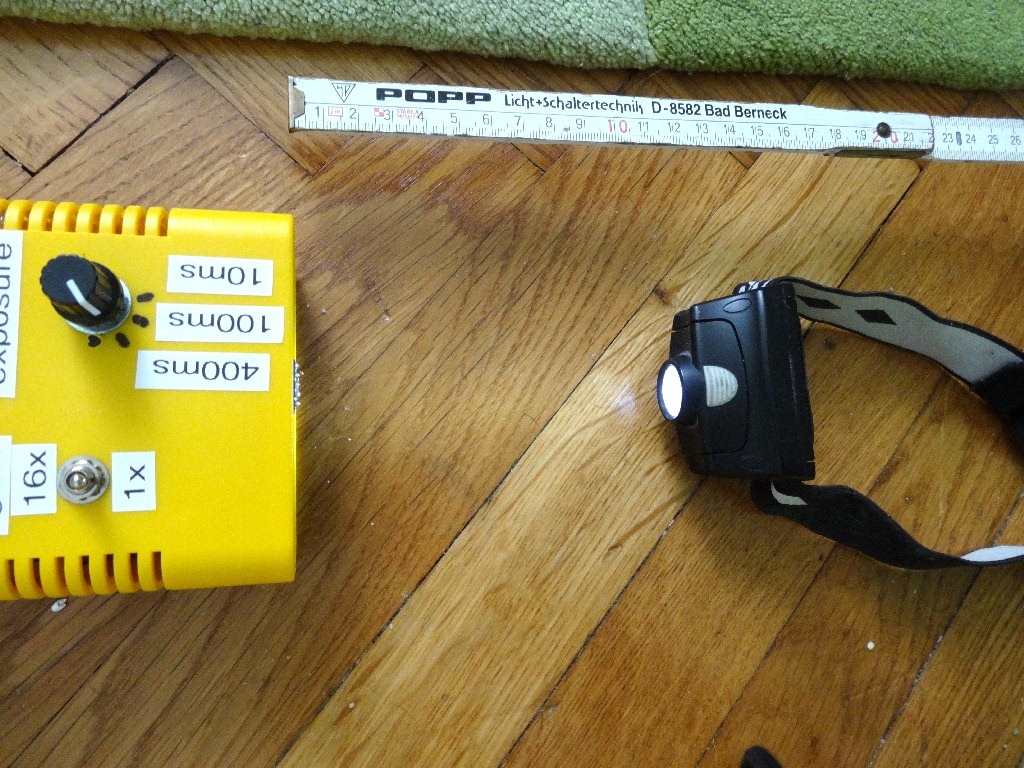
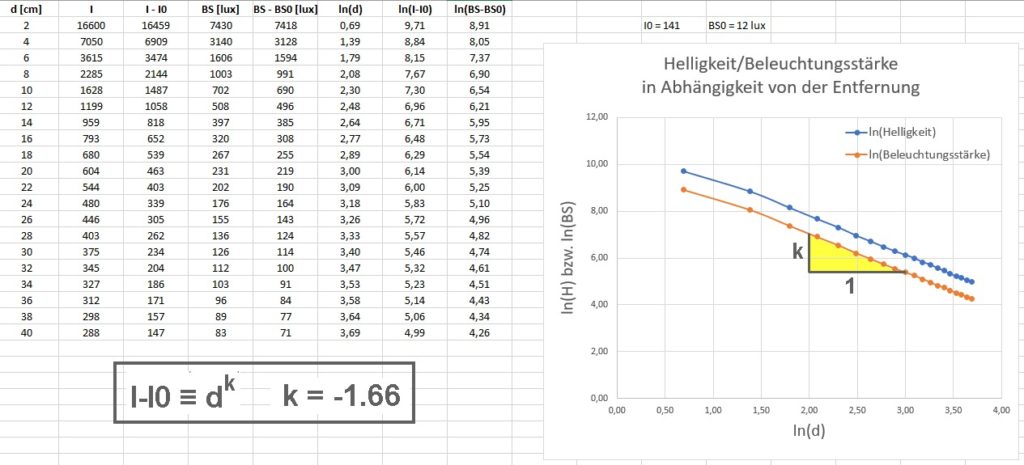
Und dann kann man noch den Einfluss der Verstärkung bzw. der Messzeit überprüfen. Sowohl die Verstärkung (1x/16x), als auch die Messdauer (10ms/100ms/400ms) spiegeln sich schön in den entsprechenden Helligkeitswerten wieder. Die Beleuchtungsstärke in Lux bleibt hingegen (weitestgehend) konstant.


Arduino-Code:
|
1 2 3 4 5 6 7 8 9 10 11 12 13 14 15 16 17 18 19 20 21 22 23 24 25 26 27 28 29 30 31 32 33 34 35 36 37 38 39 40 41 42 43 44 45 46 47 48 49 50 51 52 53 54 55 56 57 58 59 60 61 62 63 64 65 66 67 68 69 70 71 72 73 74 75 76 77 78 79 80 81 82 83 84 85 86 87 88 89 90 91 92 93 94 95 96 97 98 99 100 101 102 103 104 105 106 107 108 109 110 111 112 113 114 115 116 117 118 119 120 121 122 123 124 125 126 127 128 129 130 131 132 133 134 135 136 137 138 139 140 141 142 143 144 145 146 147 148 149 150 151 152 153 154 155 156 157 158 159 160 161 162 163 164 165 166 167 168 169 170 171 172 173 174 175 176 177 178 179 180 181 182 183 184 185 186 187 188 189 190 191 192 193 194 195 196 197 198 199 200 201 202 203 204 205 206 207 208 209 210 211 212 213 214 215 216 217 218 219 220 221 222 223 224 225 226 227 228 229 230 231 232 233 234 235 236 237 238 239 240 241 242 243 244 245 246 247 248 249 250 251 252 253 254 255 256 257 258 259 260 261 262 263 264 265 266 267 268 269 270 271 272 273 274 275 276 277 278 279 280 281 282 283 284 285 286 287 288 289 290 291 292 293 294 295 296 297 298 299 300 301 302 303 304 305 306 307 308 309 310 311 312 313 314 315 316 317 318 319 320 321 322 323 324 325 326 327 328 329 330 331 332 333 334 335 336 337 338 339 340 341 342 343 344 345 346 347 348 349 350 351 352 353 354 355 356 357 358 359 |
#include <LiquidCrystal_I2C.h> #include <Wire.h> LiquidCrystal_I2C lcd(0x27,16,2); // set the LCD address to 0x27 for a 16 chars and 2 line display. ACHTUNG: Adresse kann auch 0x3F sein !!! // Anschlüsse: // GND - GND // VCC - 5V // SDA - ANALOG Pin 4 // SCL - ANALOG pin 5 #include <SparkFunTSL2561.h> #include <Wire.h> int gain_pin = 12; boolean gain_alt, gain_neu; int integration_alt, integration_neu; // Create an SFE_TSL2561 object, here called "light": SFE_TSL2561 light; // Global variables: boolean gain; // Gain setting, 0 = x1, 1 = x16; unsigned char time; // integration time setting, 0: integration-time ms = 14 ms, 1: integration-time ms = 101 ms, 2: integration-time ms = 402 ms unsigned int ms; // Integration ("shutter") time in milliseconds double lux; // Resulting lux value boolean good; // True if neither sensor is saturated unsigned int full, IR; // =========================== // ======= SETUP ========= // =========================== void setup() { // Initialize the Serial port: Serial.begin(9600); lcd.begin(); // initialize the lcd lcd.backlight(); lcd.setCursor(0,0); lcd.print("Luxmeter"); delay(3000); lcd.setCursor(0,0); lcd.print(" "); Serial.println("TSL2561 example sketch"); pinMode(gain_pin, INPUT); // Lese erstmalig den gain-pin ein // =============================== gain_alt = digitalRead(gain_pin); if(gain_alt == LOW) { gain = 0; Serial.print("gain = "); Serial.println(gain); } else { gain = 1; Serial.print("gain = "); Serial.println(gain); } // Lese erstmalig den rotary switch ein // ==================================== integration_alt = analogRead(A0); if(integration_alt < 200) { time = 0; Serial.print("Drehschalterwert = "); Serial.println(integration_alt); } if(integration_alt > 400 && integration_alt < 600) { time = 1; Serial.print("Drehschalterwert = "); Serial.println(integration_alt); } if(integration_alt > 800) { time = 2; Serial.print("Drehschalterwert = "); Serial.println(integration_alt); } // Initialize the SFE_TSL2561 library // You can pass nothing to light.begin() for the default I2C address (0x39), // or use one of the following presets if you have changed // the ADDR jumper on the board: // TSL2561_ADDR_0 address with '0' shorted on board (0x29) // TSL2561_ADDR default address (0x39) // TSL2561_ADDR_1 address with '1' shorted on board (0x49) light.begin(); // Get factory ID from sensor: // (Just for fun, you don't need to do this to operate the sensor) unsigned char ID; if (light.getID(ID)) { Serial.print("Got factory ID: 0X"); Serial.print(ID,HEX); Serial.println(", should be 0X5X"); } else { byte error = light.getError(); printError(error); } // The light sensor has a default integration time of 402ms, // and a default gain of low (1X). // If you would like to change either of these, you can // do so using the setTiming() command. // If gain = false (0), device is set to low gain (1X) // If gain = high (1), device is set to high gain (16X) // gain = 0; // If time = 0, integration-time ms will be 14 ms // If time = 1, integration-time ms will be 101 ms // If time = 2, integration-time ms will be 402 ms // If time = 3, use manual start / stop to perform your own integration // time = 0; // setTiming() will set the third parameter (ms) to the // requested integration time in ms (this will be useful later): Serial.println("Set timing..."); light.setTiming(gain,time,ms); Serial.print("ms = "); Serial.println(ms); // To start taking measurements, power up the sensor: Serial.println("Powerup..."); light.setPowerUp(); // The sensor will now gather light during the integration time. // After the specified time, you can retrieve the result from the sensor. // Once a measurement occurs, another integration period will start. } // =========================== // ======= LOOP ========= // =========================== void loop() { // Lese den gain-pin ein und nur bei Veränderung wird der gain-Wert geändert // ========================================================================= gain_neu = digitalRead(gain_pin); if(gain_neu != gain_alt) { gain_alt = gain_neu; if(gain_neu == LOW) { gain = 0; Serial.print("gain = "); Serial.println(gain); } else { gain = 1; Serial.print("gain = "); Serial.println(gain); } light.setTiming(gain,time,ms); } // Lese den integration-pin ein und nur bei Veränderung wird der integration-Wert geändert // ======================================================================================= integration_neu = analogRead(A0); //Serial.println(integration_neu); if(integration_neu > 1.05 * integration_alt or integration_neu < 0.95 * integration_alt) { integration_alt = integration_neu; if(integration_neu < 200) { time = 0; Serial.print("Drehschalterwert = "); Serial.println(integration_neu); } if(integration_neu > 400 && integration_neu < 600) { time = 1; Serial.print("Drehschalterwert = "); Serial.println(integration_neu); } if(integration_neu > 800) { time = 2; Serial.print("Drehschalterwert = "); Serial.println(integration_neu); } light.setTiming(gain,time,ms); } delay(300); // Wait between measurements before retrieving the result // (You can also configure the sensor to issue an interrupt // when measurements are complete) // This sketch uses the TSL2561's built-in integration timer. // You can also perform your own manual integration timing // by setting "time" to 3 (manual) in setTiming(), // then performing a manualStart() and a manualStop() as in the below // commented statements: // ms = 1000; // light.manualStart(); // delay(ms); // light.manualStop(); // Once integration is complete, we'll retrieve the data. // There are two light sensors on the device, one for visible light // and one for infrared. Both sensors are needed for lux calculations. // Retrieve the data from the device: if (light.getData(full,IR)) { // getData() returned true, communication was successful Serial.print("full: "); Serial.print(full); Serial.print(" IR: "); Serial.print(IR); // To calculate lux, pass all your settings and readings // to the getLux() function. // The getLux() function will return 1 if the calculation // was successful, or 0 if one or both of the sensors was // saturated (too much light). If this happens, you can // reduce the integration time and/or gain. // For more information see the hookup guide at: https://learn.sparkfun.com/tutorials/getting-started-with-the-tsl2561-luminosity-sensor // Perform lux calculation: good = light.getLux(gain,ms,full,IR,lux); // Print out the results: Serial.print(" lux: "); Serial.print(lux); if (good) Serial.println(" (good)"); else Serial.println(" (BAD)"); /* Serial.print("ms = "); Serial.println(ms); */ lcd.setCursor(0,0); lcd.print(" "); lcd.setCursor(0,0); lcd.print(full); lcd.setCursor(7,0); lcd.print("IR: "); lcd.setCursor(11,0); lcd.print(IR); lcd.setCursor(0,1); lcd.print("BS: "); lcd.print(lux, 1); lcd.print(" lux "); delay(50); } else { // getData() returned false because of an I2C error, inform the user. byte error = light.getError(); printError(error); } //delay(1000); } void printError(byte error) // If there's an I2C error, this function will print out an explanation. { Serial.print("I2C error: "); Serial.print(error,DEC); Serial.print(", "); switch(error) { case 0: Serial.println("success"); break; case 1: Serial.println("data too long for transmit buffer"); break; case 2: Serial.println("received NACK on address (disconnected?)"); break; case 3: Serial.println("received NACK on data"); break; case 4: Serial.println("other error"); break; default: Serial.println("unknown error"); } } |

